
最近对Core Animation和Core Graphics的内容东西比较感兴趣,自己之前也在这块相对薄弱,趁此机会也想补习一下这块的内容,所以之后几篇可能都会是对CA和CG学习的记录的文章。
在应用里一个很常见的需求是主题变换:同样的图标,同样的素材,但是需要按照用户喜爱变为不同的颜色。在iOS5和6的SDK里部分标准控件引入了tintColor,来满足个性化界面的需求,但是Apple在这方面还远远做的不够。一是现在用默认控件根本难以做出界面优秀的应用,二是tintColor所覆盖的并不够全面,在很多情况下开发者都无法使用其来完成个性化定义。解决办法是什么?最简单当然是拜托设计师大大出图,想要蓝色主题?那好,开PS盖个蓝色图层出一套蓝色的UI;又想加粉色UI,那好,再出一套粉色的图然后导入Xcode。代码上的话根据颜色需求使用image-blue或者image-pink这样的名字来加载图片。
如果有一丁点重构的意识,就会知道这不是一个很好的解决方案。工程中存在大量的冗余和重复(就算你要狡辩这些图片颜色不同不算重复,你也会在内心里知道这种狡辩是多么无力),这是非常致命的。想象一下如果你有10套主题界面,先不论应用的体积会膨胀到多少,光是想做一点修改就会痛苦万分,比如希望改一下某个按钮的形状,很好,设计师大大请重复地修改10遍,并出10套UI,然后一系列的重命名,文件移动和导入…一场灾难。
当然有其他办法,因为说白了就是tint不同的颜色到图片上而已,如果我们能实现改变UIImage的颜色,那我们就只需要一套UI,然后用代码来改变UI的颜色就可以了,生活有木有一下光明起来呀。嗯,让我们先从一张图片开始吧~下面是一张带有alpha通道的图片,原始颜色是纯的灰色(当然什么颜色都可以,只不过我这个人现在暂时比较喜欢灰色而已)。
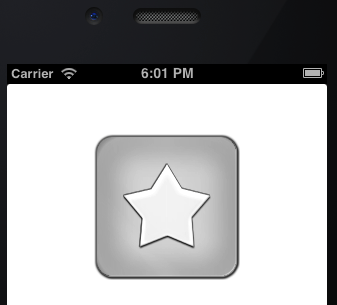
我们将用blending给这张图片加上另一个纯色作为tint,并保持原来的alpha通道。用Core Graphics来做的话,大概的想法很直接:
- 创建一个上下文用以画新的图片
- 将新的tintColor设置为填充颜色
- 将原图片画在创建的上下文中,并用新的填充色着色(注意保持alpha通道)
- 从当前上下文中取得图片并返回
最麻烦的部分可能就是保持alpha通道了。UIImage的文档中提供了使用blend绘图的方法drawInRect:blendMode:alpha:,rect和alpha都没什么问题,但是blendMode是个啥玩意儿啊…继续看文档,关于CGBlendMode的文档,里面有一大堆看不懂的枚举值,比如这样:
1
2
3
4
kCGBlendModeDestinationOver
R = S*(1 - Da) + D
Available in iOS 2.0 and later.
Declared in CGContext.h.
完全不懂..直接看之后的Discussion部分:
The blend mode constants introduced in OS X v10.5 represent the Porter-Duff blend modes. The symbols in the equations for these blend modes are:
R is the premultiplied result
S is the source color, and includes alpha
D is the destination color, and includes alpha
Ra, Sa, and Da are the alpha components of R, S, and D
原来如此,R表示结果,S表示包含alpha的原色,D表示包含alpha的目标色,Ra,Sa和Da分别是三个的alpha。明白了这些以后,就可以开始寻找我们所需要的blend模式了。相信你可以和我一样,很快找到这个模式:
1
2
3
4
kCGBlendModeDestinationIn
R = D*Sa
Available in iOS 2.0 and later.
Declared in CGContext.h.
结果 = 目标色和原色透明度的加成,看起来正式所需要的。啦啦啦,还等什么呢,开始动手实现看看对不对吧~
为了以后使用方便,当然是祭出Category,先创建一个UIImage的类别:
1
2
3
4
5
6
7
8
9
//  UIImage+Tint.h

#import <UIKit/UIKit.h>

@interface UIImage (Tint)

- (UIImage *) imageWithTintColor:(UIColor *)tintColor;

@end
暂时先这样,当然我们也可以创建一个类方法直接完成从bundle读取图片然后加tintColor,但是很多时候并不如上面一个实例方法方便(比如想要从非bundle的地方获取图片),这个问题之后再说。那么就按照之前设想的步骤来实现吧:
1
2
3
4
5
6
7
8
9
10
11
12
13
14
15
16
17
18
19
20
21
22
//  UIImage+Tint.m

#import "UIImage+Tint.h"

@implementation UIImage (Tint)
- (UIImage *) imageWithTintColor:(UIColor *)tintColor
{
    //We want to keep alpha, set opaque to NO; Use 0.0f for scale to use the scale factor of the device’s main screen.
    UIGraphicsBeginImageContextWithOptions(self.size, NO, 0.0f);
    [tintColor setFill];
    CGRect bounds = CGRectMake(0, 0, self.size.width, self.size.height);
    UIRectFill(bounds);

    //Draw the tinted image in context
    [self drawInRect:bounds blendMode:kCGBlendModeDestinationIn alpha:1.0f];

    UIImage *tintedImage = UIGraphicsGetImageFromCurrentImageContext();
    UIGraphicsEndImageContext();

    return tintedImage;
}
@end
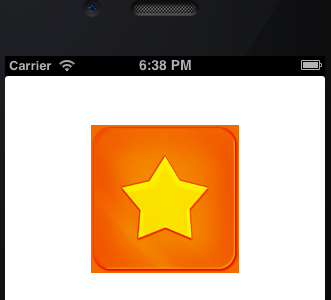
简单明了,没有任何难点。测试之:[[UIImage imageNamed:@"image"] imageWithTintColor:[UIColor orangeColor]];,得到的结果为:

嗯…怎么说呢,虽然tintColor的颜色是变了,但是总觉得怪怪的。仔细对比一下就会发现,原来灰色图里星星和周围的灰度渐变到了橙色的图里好像都消失了:星星整个变成了橙色,周围的一圈漂亮的光晕也没有了,这是神马情况啊…这种图能交差的话那算见鬼了,会被设计和产品打死的吧。对于无渐变的纯色图的图来说直接用上面的方法是没问题的,但是现在除了Metro的大色块以外哪里无灰度渐变的设计啊…检查一下使用的blend,R = D * Sa,恍然大悟,我们虽然保留了原色的透明度,但是却把它的所有的灰度信息弄丢了。怎么办?继续刨CGBlendMode的文档吧,那么多blend模式应该总有我们需要的。功夫不负有心人,kCGBlendModeOverlay一副嗷嗷待选的样子:
1
2
3
4
kCGBlendModeOverlay
Either multiplies or screens the source image samples with the background image samples, depending on the background color. The result is to overlay the existing image samples while preserving the highlights and shadows of the background. The background color mixes with the source image to reflect the lightness or darkness of the background.
Available in iOS 2.0 and later.
Declared in CGContext.h.
kCGBlendModeOverlay可以保持背景色的明暗,也就是灰度信息,听起来正是我们需要的。加入到声明中,并且添加相应的实现( 顺便重构一下原来的代码 :) ):
1
2
3
4
5
6
7
8
9
10
//  UIImage+Tint.h

#import <UIKit/UIKit.h>

@interface UIImage (Tint)

- (UIImage *) imageWithTintColor:(UIColor *)tintColor;
- (UIImage *) imageWithGradientTintColor:(UIColor *)tintColor;

@end
1
2
3
4
5
6
7
8
9
10
11
12
13
14
15
16
17
18
19
20
21
22
23
24
25
26
27
28
29
30
31
32
33
//  UIImage+Tint.m

#import "UIImage+Tint.h"

@implementation UIImage (Tint)
- (UIImage *) imageWithTintColor:(UIColor *)tintColor
{
    return [self imageWithTintColor:tintColor blendMode:kCGBlendModeDestinationIn];
}

- (UIImage *) imageWithGradientTintColor:(UIColor *)tintColor
{
    return [self imageWithTintColor:tintColor blendMode:kCGBlendModeOverlay];
}

- (UIImage *) imageWithTintColor:(UIColor *)tintColor blendMode:(CGBlendMode)blendMode
{
    //We want to keep alpha, set opaque to NO; Use 0.0f for scale to use the scale factor of the device’s main screen.
    UIGraphicsBeginImageContextWithOptions(self.size, NO, 0.0f);
    [tintColor setFill];
    CGRect bounds = CGRectMake(0, 0, self.size.width, self.size.height);
    UIRectFill(bounds);

    //Draw the tinted image in context
    [self drawInRect:bounds blendMode:blendMode alpha:1.0f];

    UIImage *tintedImage = UIGraphicsGetImageFromCurrentImageContext();
    UIGraphicsEndImageContext();

    return tintedImage;
}

@end
完成,测试之…好吧,好尴尬,虽然颜色和周围的光这次对了,但是透明度又没了啊魂淡..一点不奇怪啊,因为kCGBlendModeOverlay本来就没承诺给你保留原图的透明度的说。
那么..既然我们用kCGBlendModeOverlay能保留灰度信息,用kCGBlendModeDestinationIn能保留透明度信息,那就两个blendMode都用不就完事儿了么~尝试之,如果在blend绘图时不是kCGBlendModeDestinationIn模式的话,则再用kCGBlendModeDestinationIn画一次:
1
2
3
4
5
6
7
8
9
10
11
12
13
14
15
16
17
18
19
20
21
22
23
24
25
26
27
28
29
30
31
32
33
34
35
36
37
//  UIImage+Tint.m

#import "UIImage+Tint.h"

@implementation UIImage (Tint)
- (UIImage *) imageWithTintColor:(UIColor *)tintColor
{
    return [self imageWithTintColor:tintColor blendMode:kCGBlendModeDestinationIn];
}

- (UIImage *) imageWithGradientTintColor:(UIColor *)tintColor
{
    return [self imageWithTintColor:tintColor blendMode:kCGBlendModeOverlay];
}

- (UIImage *) imageWithTintColor:(UIColor *)tintColor blendMode:(CGBlendMode)blendMode
{
    //We want to keep alpha, set opaque to NO; Use 0.0f for scale to use the scale factor of the device’s main screen.
    UIGraphicsBeginImageContextWithOptions(self.size, NO, 0.0f);
    [tintColor setFill];
    CGRect bounds = CGRectMake(0, 0, self.size.width, self.size.height);
    UIRectFill(bounds);

    //Draw the tinted image in context
    [self drawInRect:bounds blendMode:blendMode alpha:1.0f];

    if (blendMode != kCGBlendModeDestinationIn) {
        [self drawInRect:bounds blendMode:kCGBlendModeDestinationIn alpha:1.0f];
    }

    UIImage *tintedImage = UIGraphicsGetImageFromCurrentImageContext();
    UIGraphicsEndImageContext();

    return tintedImage;
}

@end
结果如下:
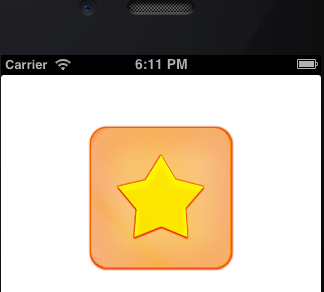
已经很完美了,这样的话只要在代码里设定一下颜色,我们就能够很轻易地使用同样一套UI,将其blend为需要的颜色,来实现素材的重用了。唯一需要注意的是,因为每次使用UIImage+Tint的方法绘图时,都使用了CG的绘制方法,这就意味着每次调用都会是用到CPU的Offscreen drawing,大量使用的话可能导致性能的问题(主要对于iPhone 3GS或之前的设备,可能同时处理大量这样的绘制调用的能力会有不足)。关于CA和CG的性能的问题,打算在之后用一篇文章来介绍一下。对于这里的UIImage+Tint的实现,可以写一套缓存的机制,来确保大量重复的元素只在load的时候blend一次,之后将其缓存在内存中以快速读取。当然这是一个权衡的问题,在时间和空间中做出正确的平衡和选择,也正是程序设计的乐趣所在。
这篇文章中作为示例的工程和UIImage+Tint可以在Github上找到,您可以随意玩弄..我相信也会是个来研究每种blend的特性的好机会~